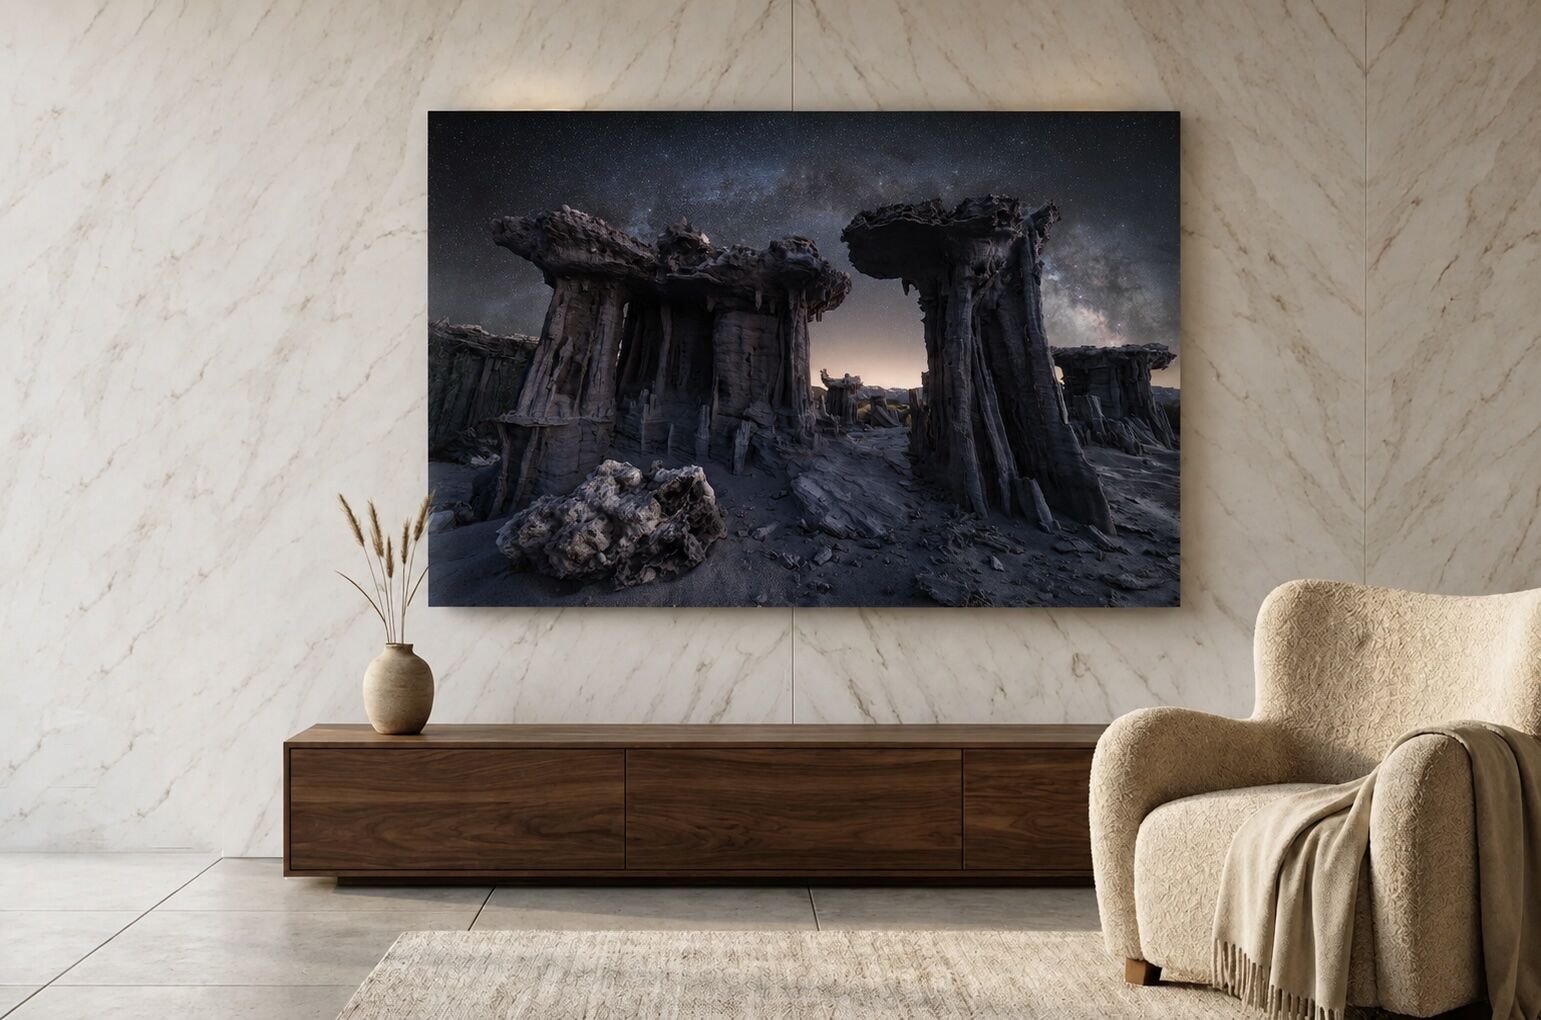
Knowing how to hang fine art photography well is the difference between a print that commands a room and one that quietly underperforms. The most important decisions are how high to hang the art, how far to place it above furniture, and which hardware can safely support the piece. This guide is written for collectors installing signed, large-format work, covering the 57-inch hanging-height rule, French cleat systems for heavy metal and acrylic prints, gallery wall spacing, staircase and dining room placement, lighting, and ongoing care.
After spending over a decade creating and selling large-format landscape photography to collectors across the Pacific Northwest and beyond, I’ve seen firsthand how proper installation can make or break a piece. I’ve watched a 40x60 metal print absolutely own a living room, and I’ve seen equally beautiful work lose all its power because it was hung six inches too high above a couch. Most of the guidance below applies whether you're hanging a 24x36, a 40x60, or a panoramic format.
How High to Hang Art: The 57-Inch Rule
Most art should be hung so the center of the piece sits about 57 to 60 inches from the floor. The single most common mistake I see collectors make is hanging their artwork too high. It happens all the time. People walk up to a wall, hold the piece where it “feels right,” and end up mounting it a foot above where it should be.
A center height of roughly 57 to 60 inches is a useful starting point because it places the middle of the artwork near average standing eye level. From there, the architecture of the room, nearby furniture, and the way the space is actually used can justify small adjustments.
For rooms with tall or vaulted ceilings, resist the urge to “fill the space” by pushing the artwork upward. The relationship that matters is between the viewer and the piece, not between the piece and the ceiling. I’ve installed work in homes with 20-foot ceilings, and the 57-to-60-inch range remains a reliable starting point.
Where to Put the Hook: The Hanging Height Formula
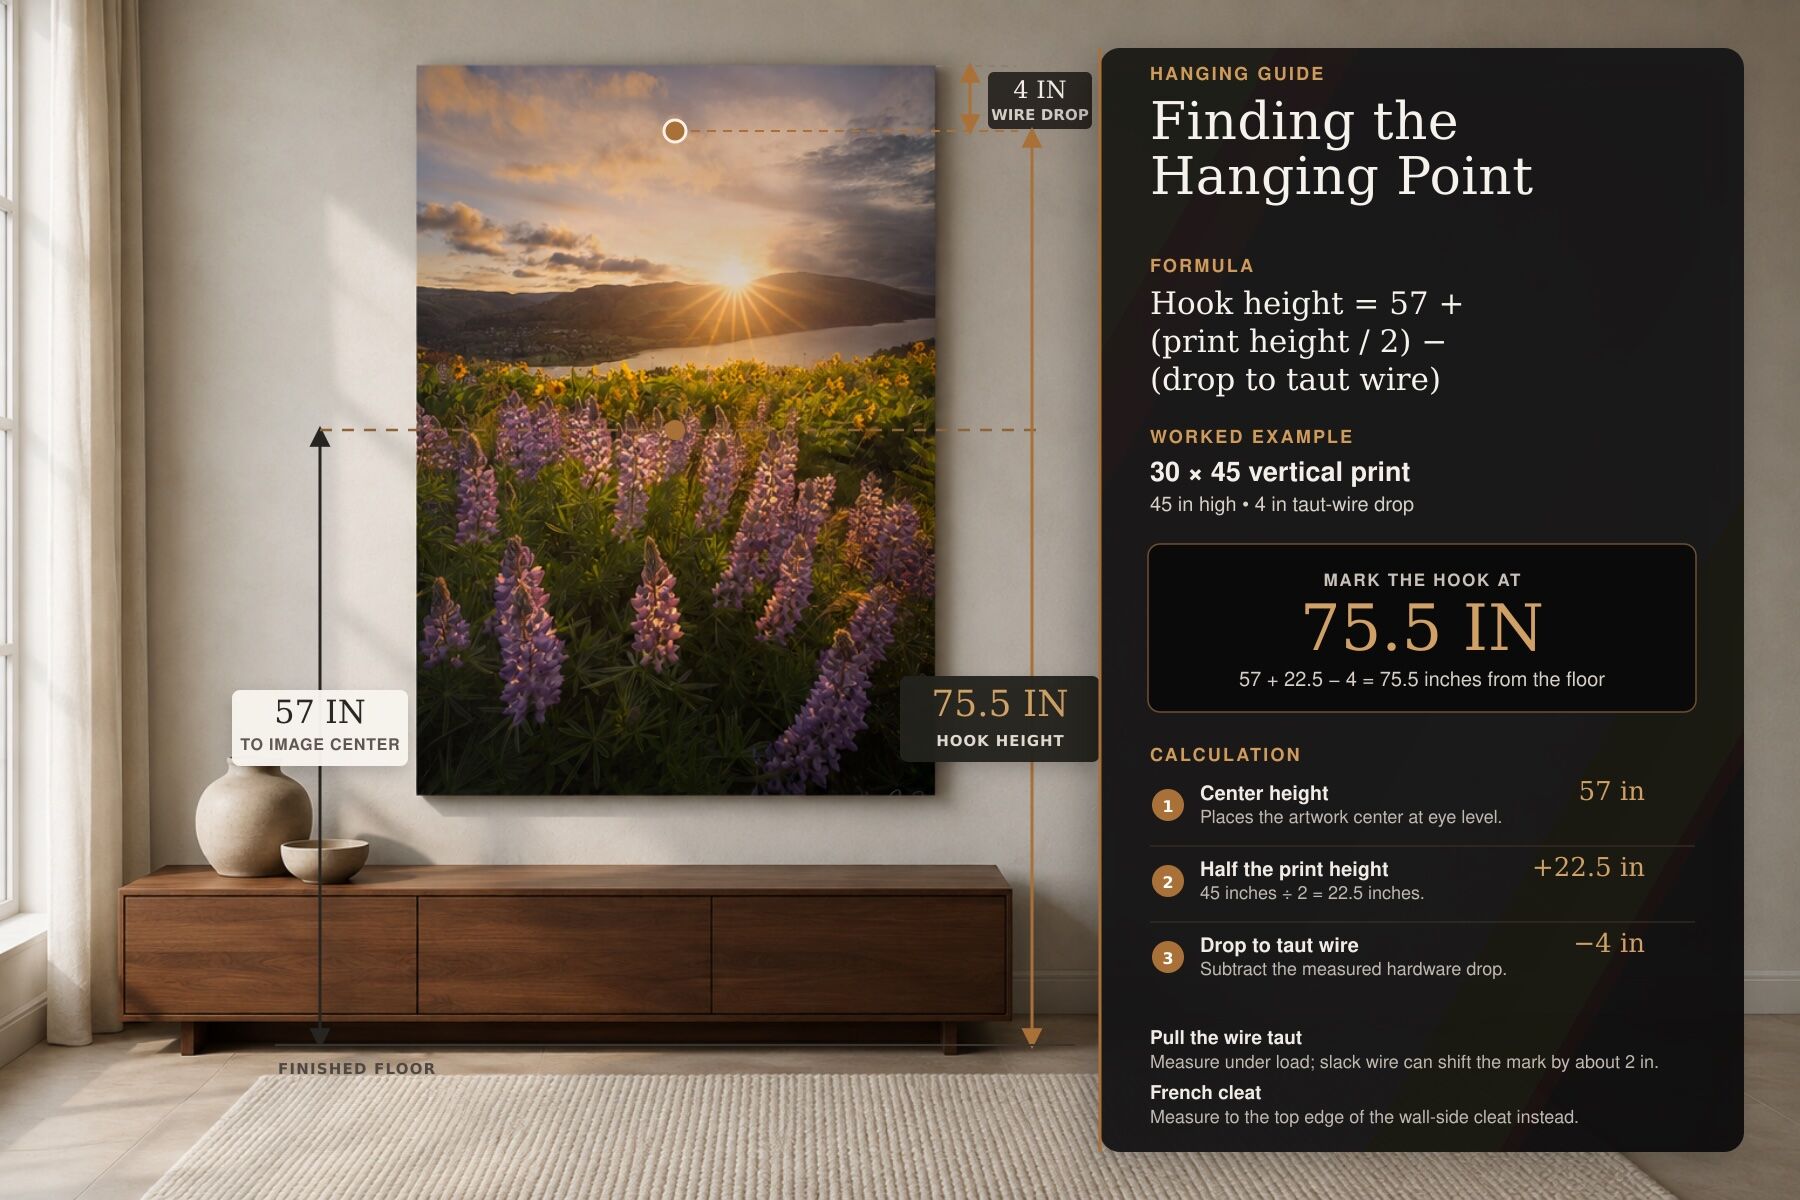
Here's the part that trips people up. The 57-inch rule tells you where the center of the image goes. It says nothing about where the hook goes, and that gap is exactly why so much artwork ends up too high. You can't measure to 57 inches and drive a nail there, because the wire or cleat sits well above the center of the piece.
The math is simple once you see it:
Hook height = 57 + (print height / 2) - (drop to taut wire)
Say you're hanging a 30x45 vertical with a 4-inch drop from the top of the frame to the wire when it's pulled taut. That's 57 plus 22.5 minus 4, which puts your hook at 75.5 inches from the floor.
Two things to watch. Measure the wire drop with the wire pulled tight, the way it will sit under load, because a slack wire will give you a number that's two inches off. And on a French cleat measure to the top edge of the wall-side cleat instead, since that edge is what carries the piece.
How High to Hang Art Above a Sofa, Console Table, or Bed
When placing a photograph above a sofa, console table, mantel, or headboard, the rules shift slightly. The bottom edge of the frame should sit roughly six to ten inches above the top of the furniture. This creates a visual connection between the piece and the furniture below it, close enough to feel intentional, but with enough breathing room to avoid crowding.
A piece of advice from years of client installations: if a large photograph above a couch feels disconnected, it’s almost always hung too high. Bring it down until the furniture and the art feel like they belong together. That’s the sweet spot.
Fine Art Print Viewing Distance Guide by Size
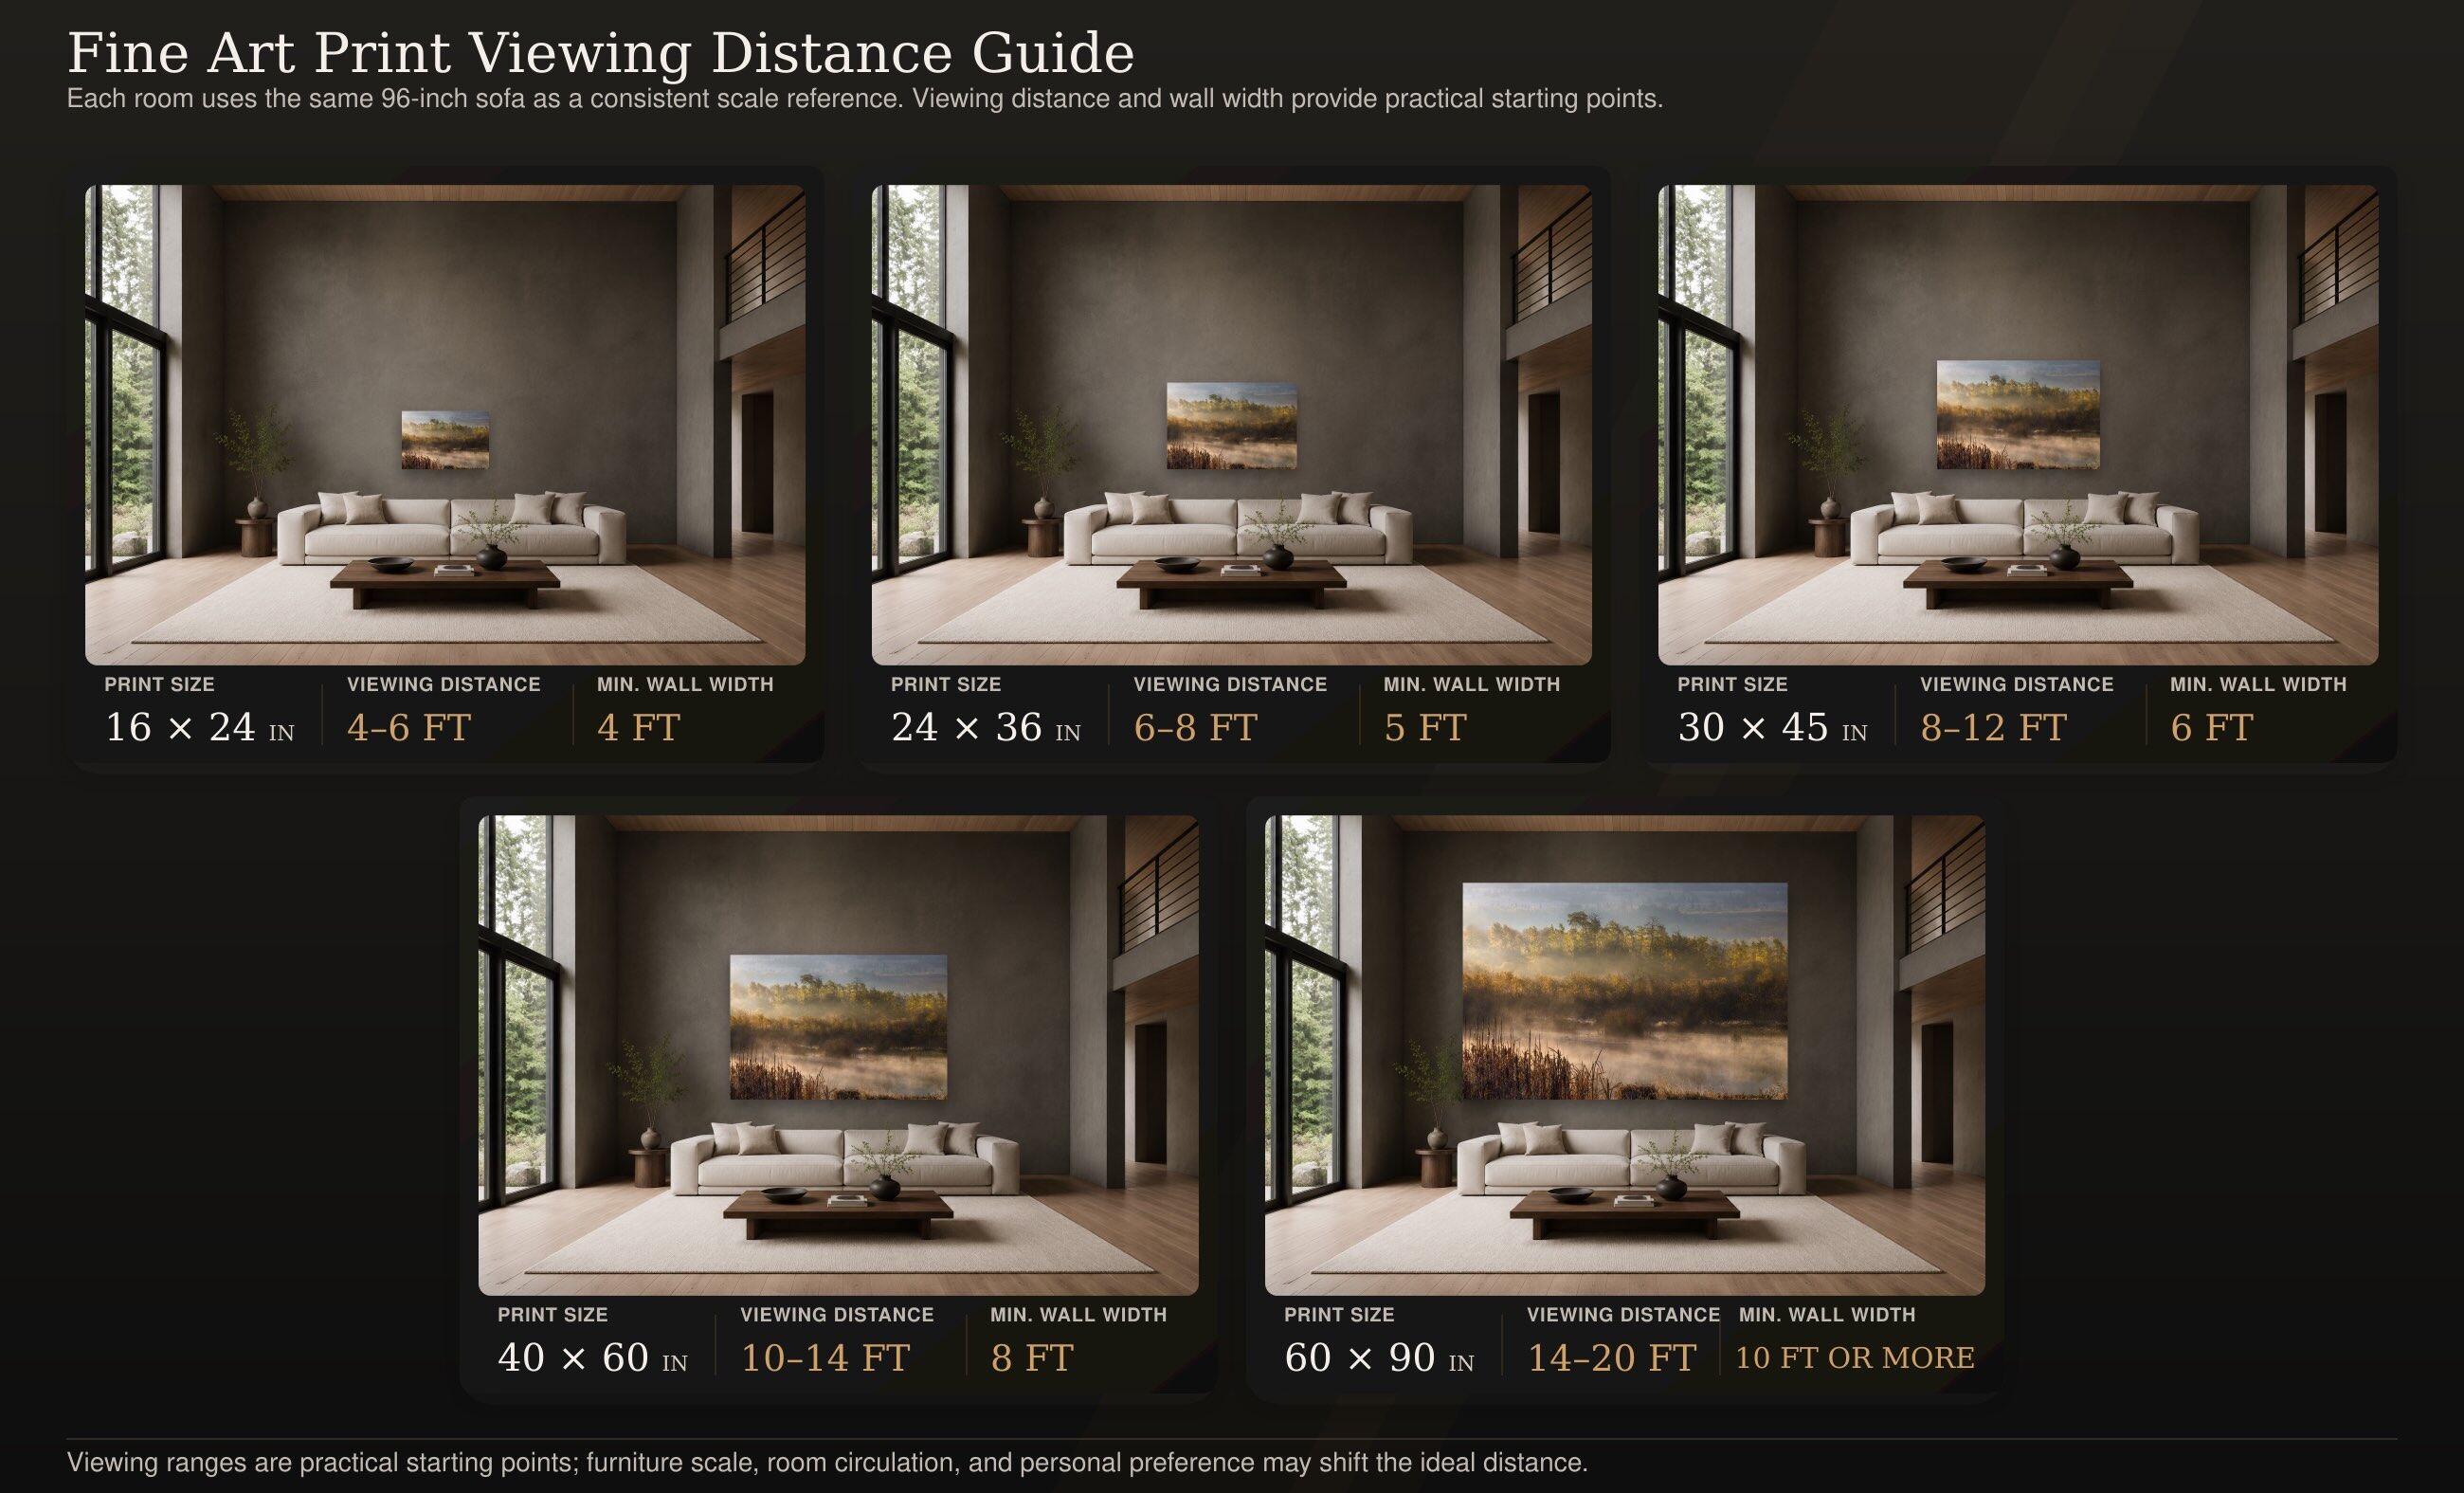
Hanging height addresses where a photograph sits on the wall. Viewing distance determines whether the print is the right size for the space in the first place. Every print is viewed best within a certain range: close enough to feel immersive, far enough to take in the whole composition. Hang a large panoramic where viewers can only stand three feet back and they'll never see it whole; hang a small print at the end of a long sightline and it disappears. The table below pairs each common fine art print size with the ideal minimum viewing distance and the minimum wall width needed to display it properly.
This is also covered extensively in my guide to choosing the right fine art photography for your home.
Gallery Wall Spacing: How Far Apart to Hang Fine Art Prints
If you’re hanging more than one piece such as a diptych, a triptych, or a curated grouping, spacing becomes critical. Inconsistent gaps between frames are one of the fastest ways to make a professional collection look careless. As a general rule, the total width of a gallery grouping should span roughly two-thirds of the furniture below it.
For most arrangements, one to three inches between frames works well. Tighter spacing (one to one and a half inches) tends to feel more gallery-like and creates a sense of unity between the images. Wider spacing (two to three inches) gives each piece more independence and works better on large walls or with bigger prints.
The key is consistency. Whatever spacing you choose, keep it uniform across the entire arrangement. I use small spacer blocks cut from scrap wood to maintain exact gaps while I’m positioning hardware. It’s a simple trick that makes a real difference.
How to Align Multiple Fine Art Prints on a Wall
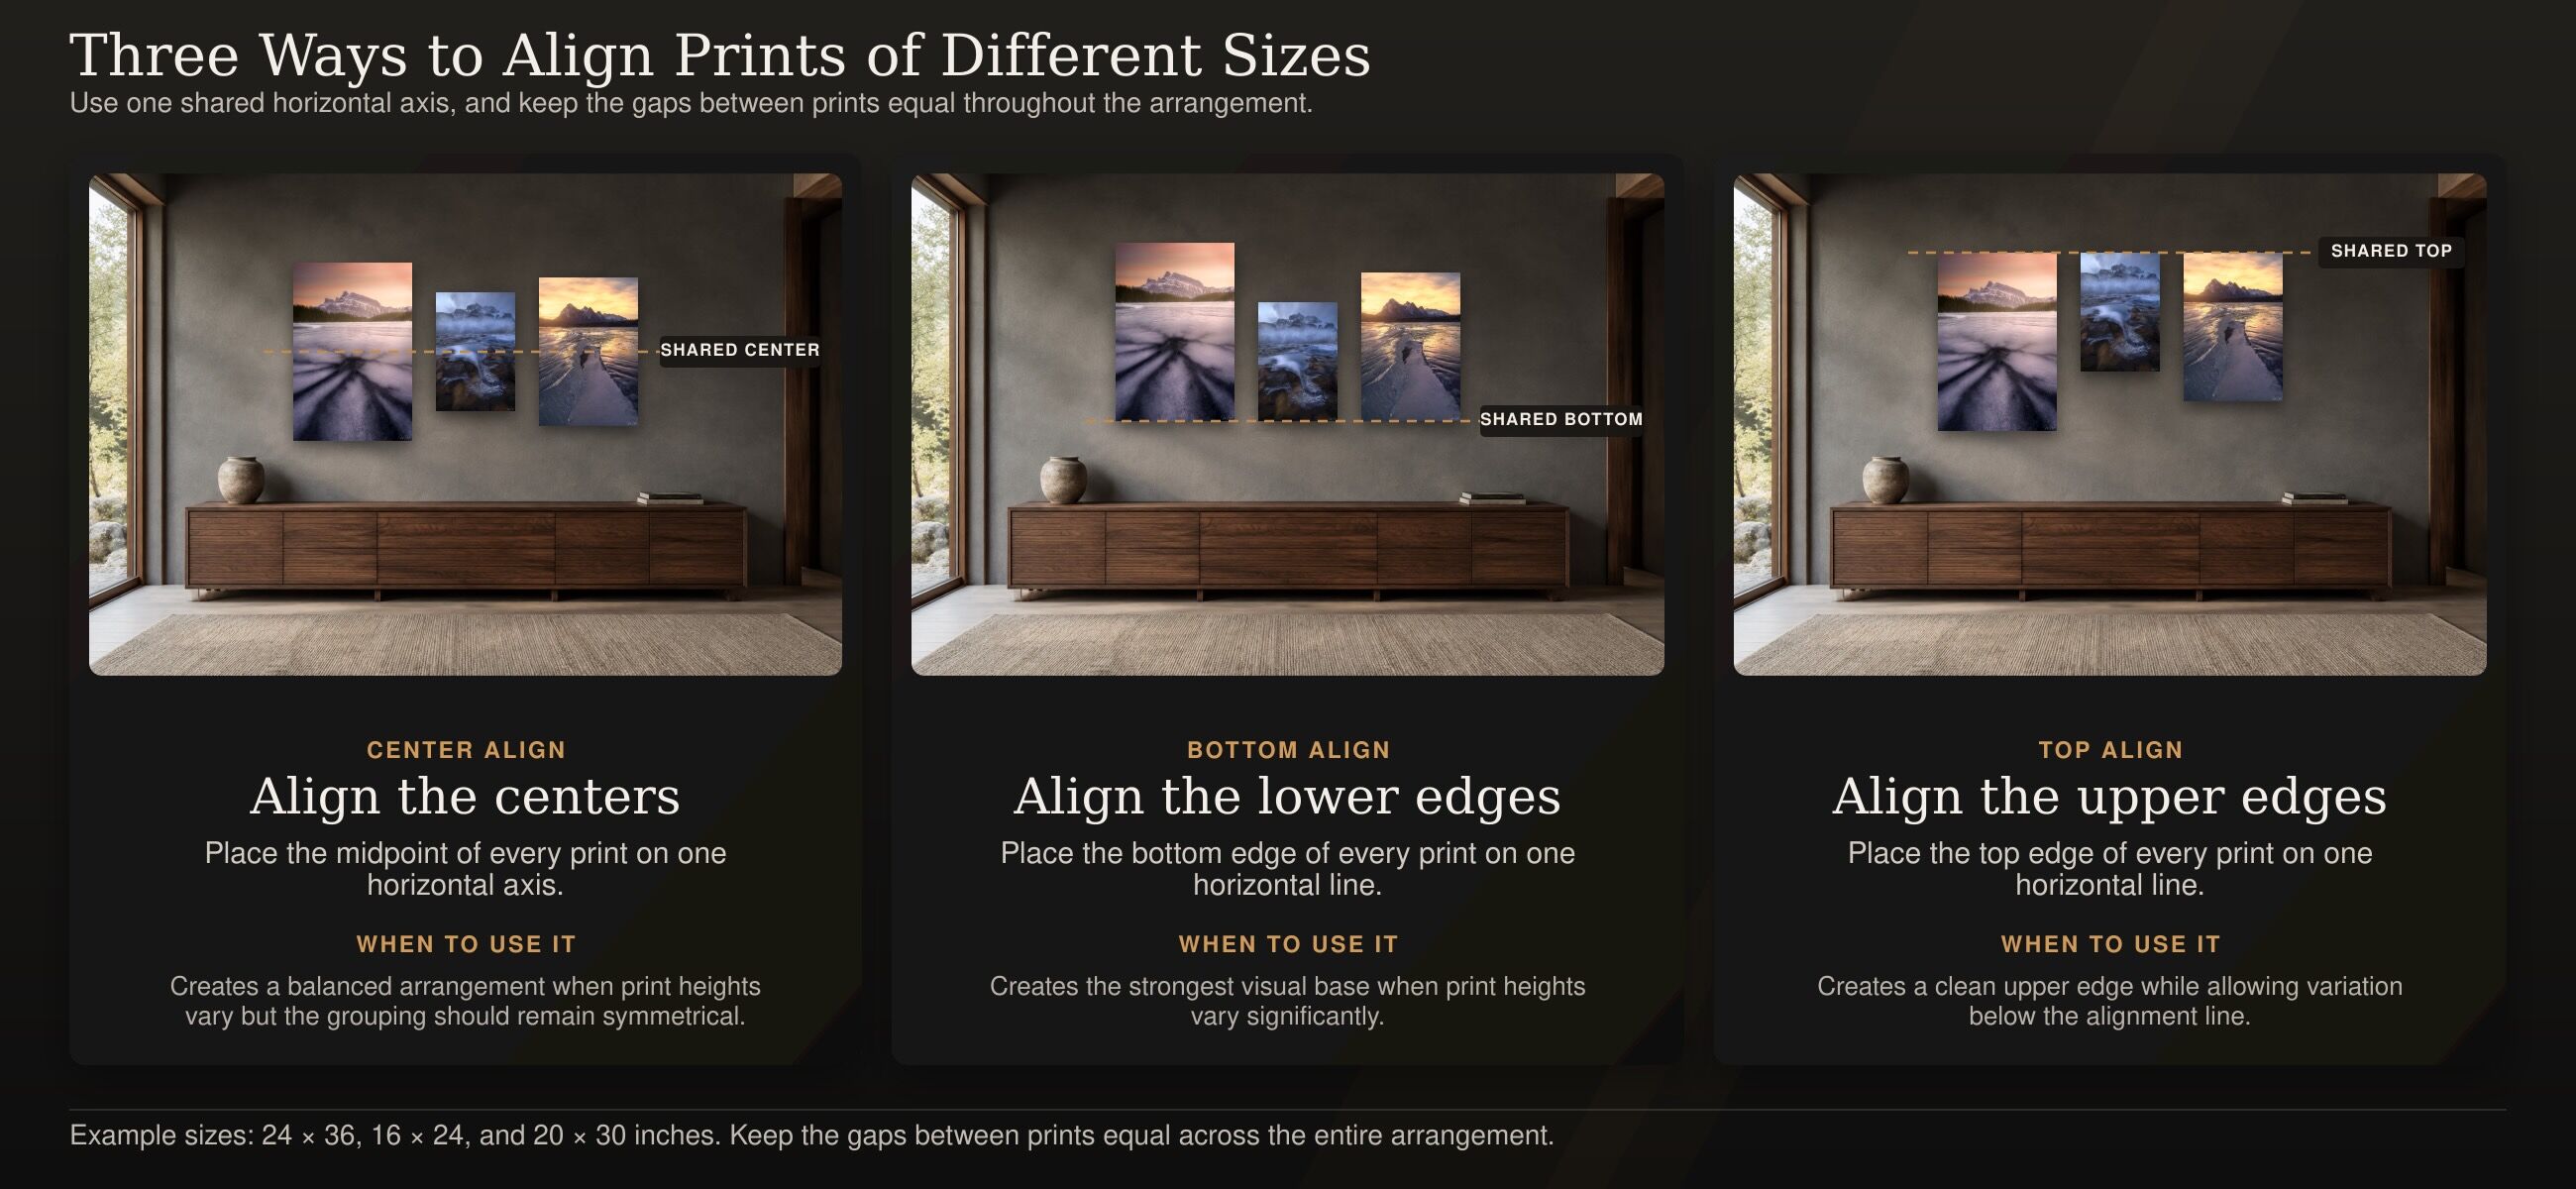
How you align multiple pieces relative to one another sends a clear signal about the intentionality of your display. There are a few common approaches, and the right one depends on your layout.
Center alignment is the go-to for symmetrical arrangements such as pieces of the same size hung in a row. Line up the center points of each frame so they all sit on the same horizontal axis.
Bottom alignment works well for gallery walls that mix different frame sizes. Anchor the bottom edges along a single line to create a sense of stability, even when the tops of the frames are staggered.
Top alignment is less common, but it can work in more modern or eclectic spaces where you want a clean upper line with visual variety below.
Whichever method you choose, balance is essential. If you’re mixing sizes, distribute the visual weight so that large pieces aren’t all clustered on one side. Think of it the way you’d compose a photograph, you want the eye to move through the arrangement, not get stuck in one spot.
How to Hang Art on a Staircase, in a Dining Room, and in a Living Room
Three placements collectors often get wrong. On a staircase, center each piece at eye level for a viewer standing on the adjacent step or landing, stepping the heights with the staircase rather than holding one line. In a dining room, consider the primary viewing position rather than automatically raising the artwork because people may be seated. Start with the standard 57-to-60-inch center height and adjust only when the furniture, sightline, or architecture clearly calls for it. In a living room, where viewers are often seated, the lower end of that range usually works well.
What You'll Need Before You Start
Nothing exotic, but having all of it within reach before you open the box saves a lot of walking back and forth:
- Tape measure and a pencil
- Stud finder
- Level, ideally a laser level for multi-piece arrangements
- Drill and driver bits
- Painter's tape for marking positions without leaving residue
- Kraft paper or butter paper for templating groupings
- A second set of hands for anything over about 20 pounds
Hanging Hardware for Fine Art Prints: French Cleats, D-Rings, and Picture Wire
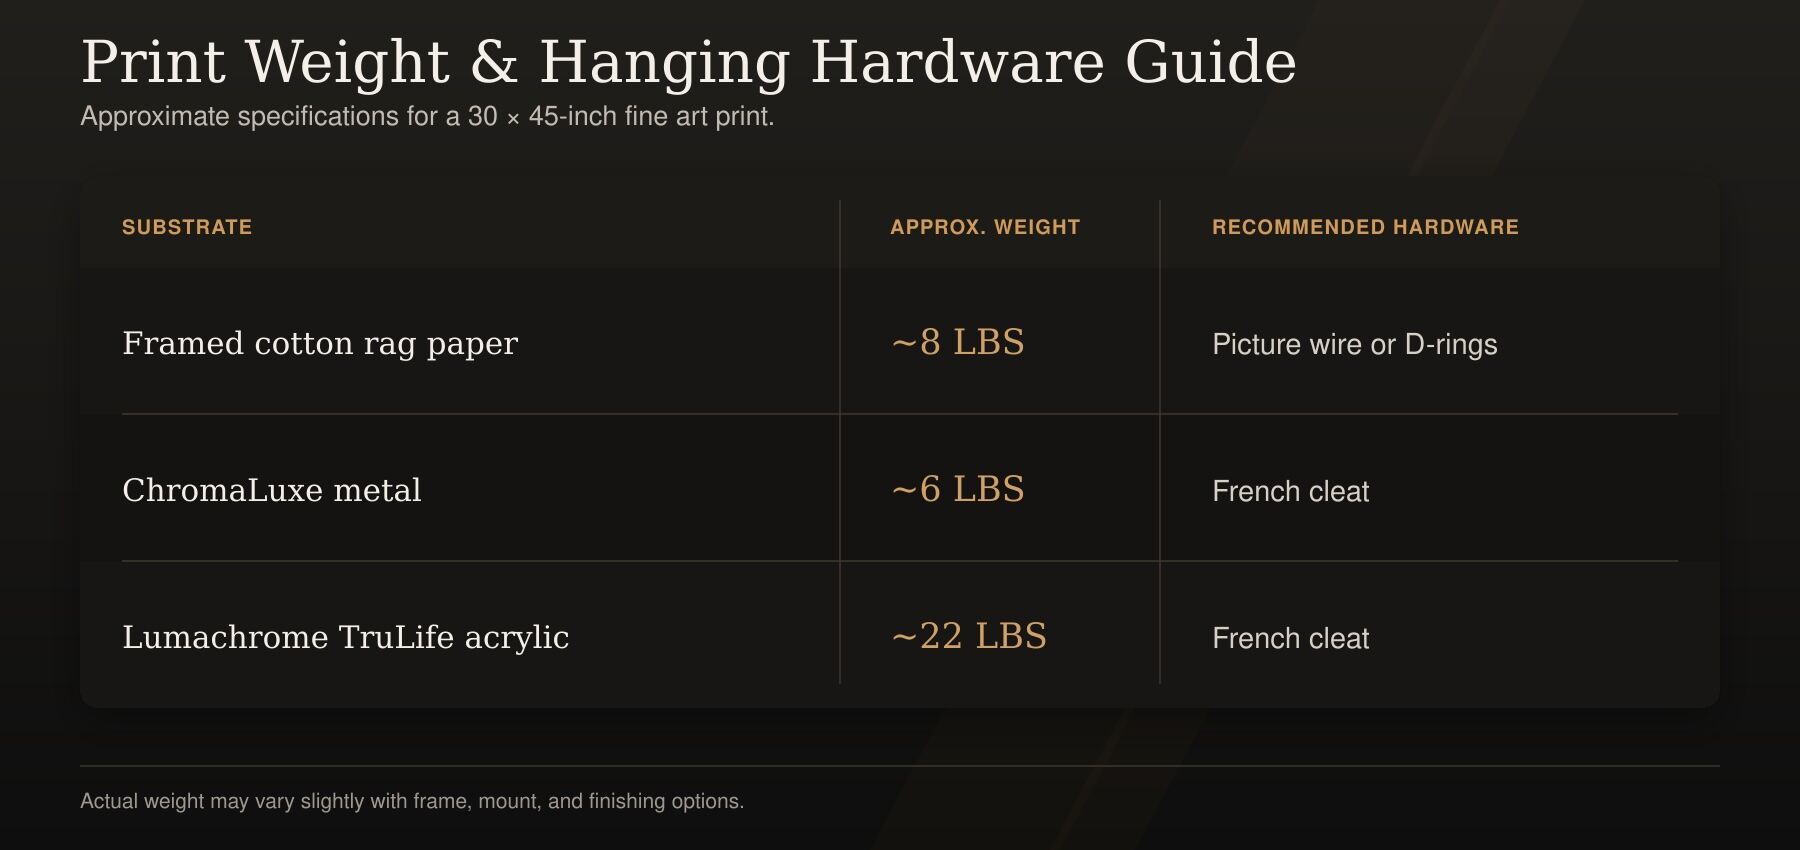
This is where a lot of collectors underestimate what's required. A framed 30x45 paper piece runs about 8 pounds, and a Lumachrome acrylic the same size runs about 22. Standard picture hooks are not built for that, and if a piece falls, you're looking at damaged art and damaged walls. Match the hardware to the substrate and weight:
French Cleats
French cleats are my preferred system for large, heavy pieces: especially metal prints, acrylic mounts, and deep floating frames. A French cleat is a strip of wood or aluminum cut at a 45-degree angle. One half mounts to the wall (beveled edge facing up and outward), and the mating piece attaches to the back of the artwork. The two halves interlock, distributing weight evenly across the entire width of the cleat.
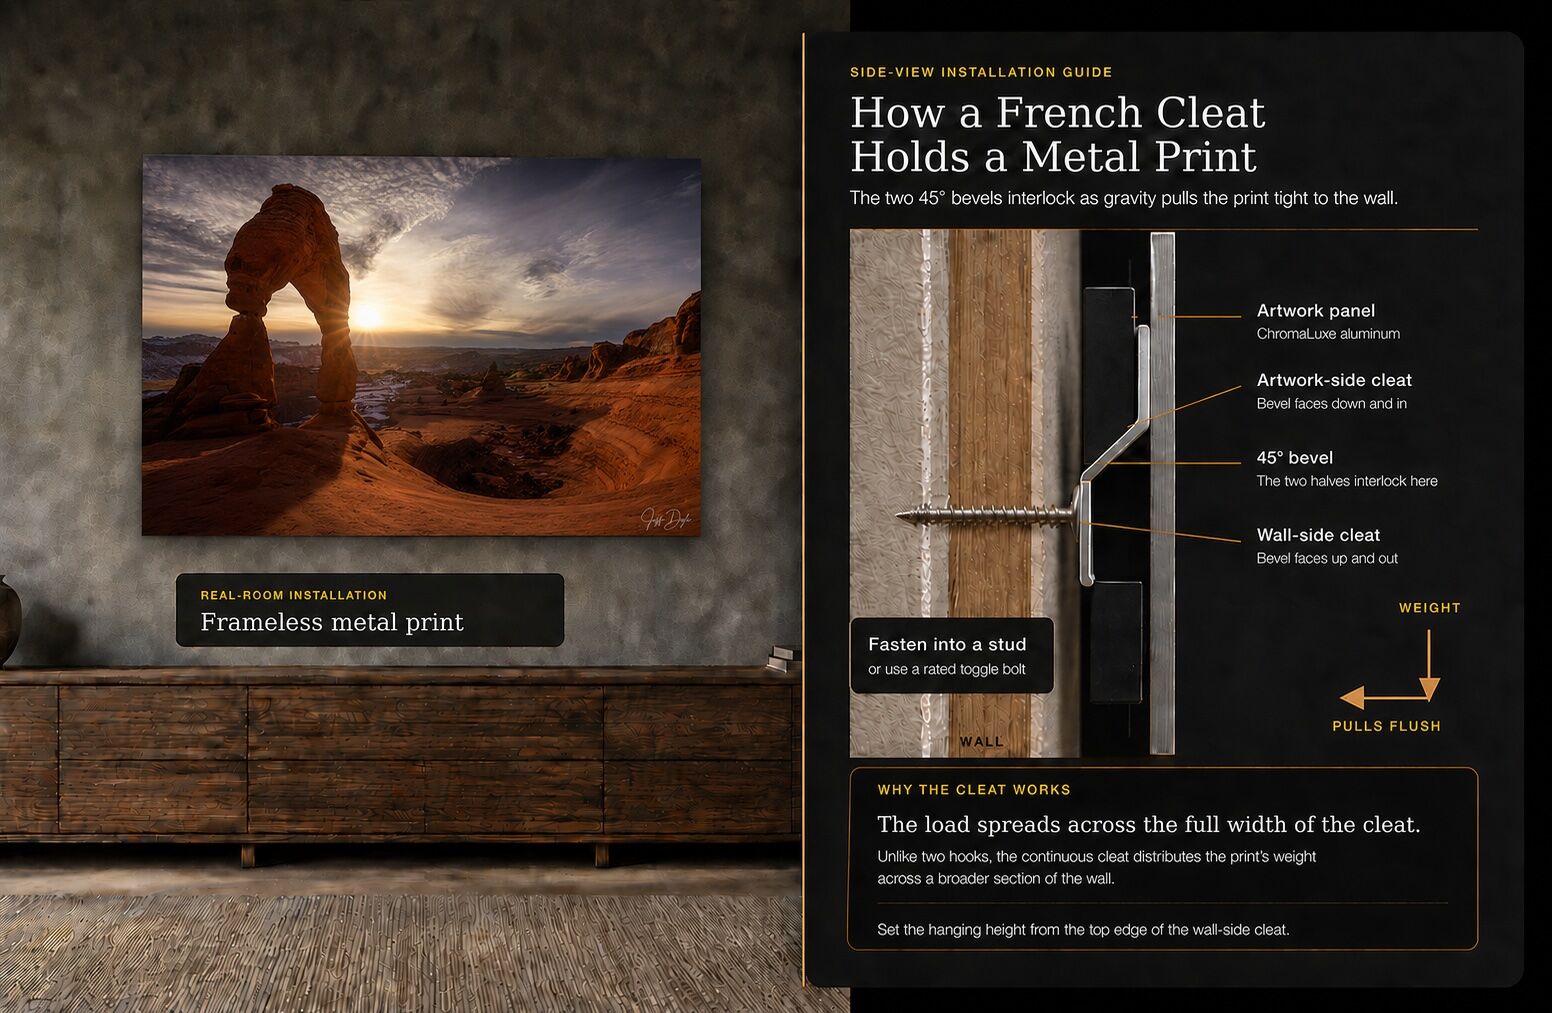
French cleats are strong, keep the artwork flush against the wall, and allow for easy horizontal adjustment during installation. For any piece over 20 inches wide, they’re hard to beat. Just make sure you’re fastening the wall-side cleat into studs or using appropriate wall anchors rated for the weight of your piece. Every ChromaLuxe metal and Lumachrome TruLife acrylic print I ship includes a French cleat mounting system so that you don't need to source hardware separately.
Installing a French Cleat, Step by Step
- Mark your line first. Work out your hook height using the formula above, then draw a level pencil line on the wall for the top edge of the wall-side cleat.
- Find your studs. Mark them along the line. A cleat spanning two studs will carry the heaviest work I produce without any anchors at all.
- Drive the center screw only. Set the cleat on your line and drive the middle screw first.
- Re-check level. With one screw in, the cleat still rotates. Level it now, while it's easy.
- Drive the remaining screws. Work outward from the center, then go back and check every screw is tight. This is the structural part of the installation.
- Push on it. Before the artwork goes anywhere near the wall, lean on the cleat with real weight. It should feel like part of the wall.
- Seat the artwork. Lift the piece, tilt the top slightly toward the wall, and lower it until the two cleats engage. You'll feel it drop into place. Slide it left or right along the cleat to fine-tune the position.
D-Rings and Picture Hangers
D-rings, the small D-shaped loops screwed into the back of a frame, pair with picture hangers or heavy-duty hooks mounted to the wall.
The trade-off to using D-rings is precision. Both hangers need to be perfectly level and spaced correctly or the piece will sit crooked. I always measure twice, mark with a laser level, and have a second pair of hands for the actual hanging. D-rings are solid, but they don’t forgive a sloppy layout.
Picture Wire
Wire strung between two D-rings or eye hooks is the most common hanging method for smaller and mid-sized framed work. It’s flexible, forgiving, and requires only a single wall hook. The downside is that wire-hung pieces tend to tilt forward at the top, especially heavier ones. For lightweight framed prints up to about 16x24 inches, wire works fine. For anything larger or heavier, I’d go with cleats or D-rings.
Matching Hardware to Wall Type
Wall material is also incredibly important when hanging a print. Any wall you select needs to be able to support the weight of your print. For heavier pieces on drywall, fastening into wall studs provides the most secure attachment whenever the placement allows it. If studs don't fall where you need them, use appropriately rated toggle bolts or other anchors designed for the wall type and the weight of the artwork rather than lightweight plastic anchors. In older homes with plaster and lath, drill a pilot hole to avoid cracking the plaster and use toggle anchors. For masonry or brick, use sleeve or wedge anchors rated for the load. When in doubt, over-spec the anchor; the cost difference is trivial next to the cost of a fallen print.
How to Plan and Hang a Multi-Piece Fine Art Arrangement
A well-executed grouping of photographs can be the centerpiece of a room, but it requires planning. I never eyeball a multi-piece layout directly on the wall because there are too many variables and too many holes to patch if you get it wrong.
Instead, start on the floor. Lay your pieces out and experiment with arrangements until the grouping feels balanced. Once you have a layout you’re happy with, trace each frame onto kraft paper or butcher paper, cut out the shapes, and tape them to the wall. This lets you step back, evaluate the composition at actual scale, and make adjustments without touching a drill.
Begin with the largest or most visually dominant piece and build outward from there. Group pieces that share a tonal palette, subject matter, or mood. Finally, it's also important to have consistent framing that ties every image together. A collection should feel curated, not random.
How to Light Fine Art Photography: Avoiding Glare and UV Damage
The right light completes an installation; the wrong light undoes it. Here are the considerations I walk every client through.
Avoid direct sunlight. Prolonged light and UV exposure can contribute to fading and deterioration over time, even with archival materials. If a wall receives strong direct sunlight, choose another location when possible or use appropriate UV-protective glazing for framed paper prints.
Watch for glare. Metal prints and acrylic face mounts are particularly prone to reflecting overhead lights and windows. Before committing to a spot, check the surface from your primary viewing position at different times of day. If you see a hot spot of reflected light across the image, adjust the placement or the light source.
Consider dedicated art lighting. Adjustable picture lights or recessed ceiling spots aimed at the artwork can transform the presentation. Warm-white LED fixtures in the 2700K to 3000K range tend to complement landscape photography well without washing out color. Position the light so it illuminates the image evenly, without casting shadows from the frame. Lumachrome TruLife acrylic is anti-reflective, but even it benefits from angled rather than direct overhead light.
Leveling, Adjustments, and Ongoing Care for Fine Art Prints
Once everything is up, take a step back to the other side of the room and evaluate. Small adjustments of a quarter inch in height or spacing can have a surprisingly big impact on how the arrangement reads.
Check that each piece is level. I carry a small bubble level for final tweaks, though most smartphones have a built-in level tool that works in a pinch.
After the initial installation, check your artwork periodically. Pieces in high-traffic areas or near doors can shift over time from vibrations. A quick check every few months takes thirty seconds and keeps your display looking sharp.
Hanging fine art photography is one of those things that separates a home with art on the walls from a home with a genuine collection. Get the height right, keep your spacing consistent, choose the proper hardware, and take the time to plan before you drill. Your artwork, and your walls, will thank you for it.
Frequently Asked Questions About Hanging Fine Art Photography
How high should I hang art?
As a starting point, center the artwork about 57 to 60 inches from the floor. This places the middle of the piece near average eye level. When hanging art above furniture, the relationship to the furniture may matter more than the standard center height.
How high should art hang above a couch or sofa?
Place the bottom of the artwork roughly 6 to 10 inches above the back of the sofa. The goal is for the art and furniture to read as one visual grouping rather than two disconnected objects. For large artwork, start toward the lower end of that range and adjust based on the proportions of the room.
Where do I put the nail or hook?
Higher than 57 inches. Use this formula: Hook height = 57 + (print height / 2) - (drop to taut wire). A 30x45 print with a 4-inch wire drop puts the hook at 75.5 inches from the floor. On a French cleat, measure to the top edge of the wall-side cleat instead of the wire.
What hardware do I need for a heavy metal or acrylic print?
A French cleat, fastened into studs and rated above the piece's weight. Metal and acrylic prints hang flush on a cleat system, and mine ship with one included. Acrylic at 30x45 runs about 22 pounds, well past what picture wire and standard hooks should carry.
How far back should I stand from a large print?
Roughly 10 to 14 feet for a 40x60 and 14 to 20 feet for a panoramic. The size should suit the wall and the sightline; see the viewing-distance table above.
How do I hang a metal print on drywall?
Use the French cleat that ships with the print. Fasten the wall-side cleat into at least one stud where possible, and mark a level line first, since the cleat sets the final height. If studs don't fall where you need them, use toggle bolts rated well above the piece's weight rather than plastic drywall anchors.